Tuesday, February 21, 2017

How to auto generate salesforce search queries?

If you are using salesforce as a developer you will need to know salesforce query language. Specially if you are using WSO2 salesforce connector, salesforce query is a must to know. Please read this article to know information on this.

We have an awesome eclipse plugin which is available for you to perform this. In this blog post, I am demonstrating how to install it and to generate a sample query.

For more information please have a look here.

Steps :

1. Install Eclipse IDE for Java developers
2. Launch Eclipse and select Help -> Install New Software
3. Click Add and in the repository dialog box, set the name to Force.com IDE and the location to https://developer.salesforce.com/media/force-ide/eclipse45. For Spring ’16 (Force.com IDE v36.0) and earlier Force.com IDE versions, use http://media.developerforce.com/force-ide/eclipse42.


4. Select IDE and click on Next to install.


5. Accept terms and Finish.


6. Restart the Eclipse.

7. When Eclipse restarts, select Window -> Open Perspective -> Other and Select Force.com and then click OK.


8. Now go to File -> New -> force.com project and provide your credentials to login to your salesforce account.


9. Click Next and it will create a project on the left pane.


10. Double click and open the schema and it will load the editor.


11. Now you can click on the preferred SF object and its fields. It will generate the SF query accordingly. Then you can run it.


Reference: https://developer.salesforce.com/docs/atlas.en-us.eclipse.meta/eclipse/ide_install.htm

Thursday, February 16, 2017

How to include batch of test data in to Salesforce Dev accounts?

When you work with salesforce, you will need to have test data in salesforce dev account.

In WSO2 if you use salesforce connector, sometimes you will need to deal with queryMore function.
For more information, please check this link.

This is a sample on how to include test data in to Salesforce.

Salesforce it self provide an awesome tool called Data loader. You can go in to this document from this link.

Im going to use this in an open source /linux environment.

Pre Req : Need JDK 1.8

Step 1 : Install data loader.

1. Check out the code from git.  (https://github.com/forcedotcom/dataloader)
git clone https://github.com/forcedotcom/dataloader.git

2. Build it

mvn clean package -DskipTests
3. To run the data loader

java -jar target/dataloader-39.0-uber.jar

Step 2 : Login to Data loader

Provide your username (email address), password along with your security token and login url E.g., (https://login.salesforce.com/services/Soap/u/39.0) I have explained how to find your api login url in one of my previous blog post.


Step 3 : Create your test data.

Click on "Export" and Next and select the salesforce object (In Here I have selected Account) where you need to have test data.


Then select the fields from the check boxes and click on Finish.


Existing data will be exported in to a csv file.

Open the extract CSV in an excel sheet and create any number of test data for just by dragging the last cell. It will increment the data in each cell. Note : You should delete the existing data in the Account from CSV before you upload. So newly incremented data will be there.


Step 3 : Import test data in to Data Loader

Next step is just just click on the "Import" -> Select the salesforce object (in here it is Account) -> Click Next -> Click on Create or Edit a Map -> Map the attributes with the coulmns in CSV as below.


Click Next -> Finish. Select a file location to save error files.

Then it will insert the bulk data and you will receive it once it is finished and success. You can also view errors if exists.


Now if you query salesforce from developer console, you will be able to see your data.


That's it! :) Happy coding!


Thursday, February 9, 2017

How to use an existing java class method inside a script mediator in WSO2

If you need to access a java class method inside WSO2 ESB script mediator, you can simply call it.

Below is an example done to call matches() method inside java.util.regex.Pattern class.

You can simply do it as below.

  <script language="js" description="extract username">  
          var isMatch = java.util.regex.Pattern.matches(".*test.*", "This is a test description!");       
  </script>  

You can access this value using property mediator if you set this in to message context.


  mc.setProperty("isMatch",isMatch);   

So a Sample synapse will be,


    <script language="js" description="extract username">
   var isMatch = java.util.regex.Pattern.matches(".*test.*", "This is a test description!"); 
          mc.setProperty("isMatch",isMatch);                 
    </script>

    <log level="custom">
       <property name="isMatch" expression="get-property('isMatch')"/>
    </log> 
                 

You can use this in a custom sequence in WSO2 API Manager as well to perform your task.

As an example, by using java.util.regex.Pattern.Matched method, you can use regular expression support in Java inside the script mediator.


Tuesday, February 7, 2017

How to convert a json/xml payload in to a backend accepts form data payload in APIM

Imagine you have a scenario, where a user sens a json or xml payload via client eventhough the backend accepts only formdata. So you need to find a method to change the payload during the mediation without editing the API synapse configuration manualy.

E.g.,

{
"userid": "123abc",
"name": "Ushani",
"address ": "Colombo"
}
in to

userid=123sbc&name=ushani&address=Colombo


You can simply achieve this by adding a custom mediation extension in to in flow since the default available mediation extensions do not support it.

In order to do this you have change the Content Type in to  application/x-www-form-urlencoded.

Sample mediation extension :


<?xml version="1.0" encoding="UTF-8"?>
<sequence xmlns="http://ws.apache.org/ns/synapse" name="formdataconvert"> 
      <property name="messageType" value="application/x-www-form-urlencoded" scope="axis2" type="STRING"/> 
   <log level="full"/>
</sequence>

How to perform an action based on a JWT claim value in APIM 2.0

To achieve this, We can use custom mediation extensions in APIM 2.0. For more details on Custom mediation, please have a look at this document [1].
When you write your custom sequence, below I have given the synapse source and explanation. In this example, we are going to do our action based on the claim value enduser as an example.

1. First we have set the X-JWT-Assertion header value in to a property named authheader.

 <property name="authheader" expression="get-property('transport','X-JWT-Assertion')" scope="default" type="STRING" description="get X-JWT-Assertion header"/>

Sample X-JWT-Assertion is as below :

X-JWT-Assertion = eyJ0eXAiOiJKV1QiLCJhbGciOiJSUzI1NiIsIng1dCI6ImFfamhOdXMyMUtWdW9GeDY1TG1rVzJPX2wxMCJ9.eyJodHRwOlwvXC93c28yLm9yZ1wvY2xhaW1zXC9hcHBsaWNhdGlvbnRpZXIiOiJVbmxpbWl0ZWQiLCJodHRwOlwvXC93c28yLm9yZ1wvY2xhaW1zXC9rZXl0eXBlIjoiUFJPRFVDVElPTiIsImh0dHA6XC9cL3dzbzIub3JnXC9jbGFpbXNcL3ZlcnNpb24iOiIxLjAuMCIsImlzcyI6IndzbzIub3JnXC9wcm9kdWN0c1wvYW0iLCJodHRwOlwvXC93c28yLm9yZ1wvY2xhaW1zXC9hcHBsaWNhdGlvbm5hbWUiOiJEZWZhdWx0QXBwbGljYXRpb24iLCJodHRwOlwvXC93c28yLm9yZ1wvY2xhaW1zXC9lbmR1c2VyIjoiYWRtaW5AY2FyYm9uLnN1cGVyIiwiaHR0cDpcL1wvd3NvMi5vcmdcL2NsYWltc1wvZW5kdXNlclRlbmFudElkIjoiLTEyMzQiLCJodHRwOlwvXC93c28yLm9yZ1wvY2xhaW1zXC9zdWJzY3JpYmVyIjoiYWRtaW4iLCJodHRwOlwvXC93c28yLm9yZ1wvY2xhaW1zXC90aWVyIjoiVW5saW1pdGVkIiwiaHR0cDpcL1wvd3NvMi5vcmdcL2NsYWltc1wvYXBwbGljYXRpb25pZCI6IjEiLCJodHRwOlwvXC93c28yLm9yZ1wvY2xhaW1zXC91c2VydHlwZSI6IkFQUExJQ0FUSU9OIiwiZXhwIjoxNDg2NDU5NTg3LCJodHRwOlwvXC93c28yLm9yZ1wvY2xhaW1zXC9hcGljb250ZXh0IjoiXC9qd3RkZWNhcGlcLzEuMC4wIn0=.FE2luGlWKZKZBVjsx7beA4WVlLFJSoHNGgJKm56maK7qddleEzTi/QhDAdyC47dW+RgkaJZLSgdvM6ROyW890io7QCOqjJZg7KnlB54qh2DBoBmAnYbmFZAC08nxnAGpeiy6W4YkYMWlJNW+lw5D3b3I4NOhyhsIStA9ec9TSQA=


2. Then we have used a script mediator to split and decode our value from the authheader.

        var temp_auth = mc.getProperty('authheader').trim();
                var val = new Array();
                val= temp_auth.split("\\.");

By the above javascript, we have split the value we get by "." I have highlighted it by Yellow color. 
Grean colored value has got our JWT claims.

3.  Then we access the 2nd value as val[1] and decode it using Base64.
                
                var auth=val[1];
            var jsonStr = Packages.java.lang.String(Packages.org.apache.axiom.om.util.Base64.decode(auth), "UTF-8");

If you decode the particular value using a base64, you wil be able to see the below value.

eyJodHRwOlwvXC93c28yLm9yZ1wvY2xhaW1zXC9hcHBsaWNhdGlvbnRpZXIiOiJVbmxpbWl0ZWQiLCJodHRwOlwvXC93c28yLm9yZ1wvY2xhaW1zXC9rZXl0eXBlIjoiUFJPRFVDVElPTiIsImh0dHA6XC9cL3dzbzIub3JnXC9jbGFpbXNcL3ZlcnNpb24iOiIxLjAuMCIsImlzcyI6IndzbzIub3JnXC9wcm9kdWN0c1wvYW0iLCJodHRwOlwvXC93c28yLm9yZ1wvY2xhaW1zXC9hcHBsaWNhdGlvbm5hbWUiOiJEZWZhdWx0QXBwbGljYXRpb24iLCJodHRwOlwvXC93c28yLm9yZ1wvY2xhaW1zXC9lbmR1c2VyIjoiYWRtaW5AY2FyYm9uLnN1cGVyIiwiaHR0cDpcL1wvd3NvMi5vcmdcL2NsYWltc1wvZW5kdXNlclRlbmFudElkIjoiLTEyMzQiLCJodHRwOlwvXC93c28yLm9yZ1wvY2xhaW1zXC9zdWJzY3JpYmVyIjoiYWRtaW4iLCJodHRwOlwvXC93c28yLm9yZ1wvY2xhaW1zXC90aWVyIjoiVW5saW1pdGVkIiwiaHR0cDpcL1wvd3NvMi5vcmdcL2NsYWltc1wvYXBwbGljYXRpb25pZCI6IjEiLCJodHRwOlwvXC93c28yLm9yZ1wvY2xhaW1zXC91c2VydHlwZSI6IkFQUExJQ0FUSU9OIiwiZXhwIjoxNDg2NDU5NTg3LCJodHRwOlwvXC93c28yLm9yZ1wvY2xhaW1zXC9hcGljb250ZXh0IjoiXC9qd3RkZWNhcGlcLzEuMC4wIn0=

{"http:\/\/wso2.org\/claims\/applicationtier":"Unlimited",
"http:\/\/wso2.org\/claims\/keytype":"PRODUCTION",
"http:\/\/wso2.org\/claims\/version":"1.0.0",
"iss":"wso2.org\/products\/am",
"http:\/\/wso2.org\/claims\/applicationname":"DefaultApplication",
"http:\/\/wso2.org\/claims\/enduser":"admin@carbon.super",
"http:\/\/wso2.org\/claims\/enduserTenantId":"-1234",
"http:\/\/wso2.org\/claims\/subscriber":"admin",
"http:\/\/wso2.org\/claims\/tier":"Unlimited",
"http:\/\/wso2.org\/claims\/applicationid":"1",
"http:\/\/wso2.org\/claims\/usertype":"APPLICATION",
"exp":1486459587,
"http:\/\/wso2.org\/claims\/apicontext":"\/jwtapi\/1.0.0"}


4. Since we get the claims values with an escape character, we need to replace the "/" with a blank.

This is the actual value we get :  "http:\/\/wso2.org\/claims\/enduser":"admin@carbon.super",

Replace function :   jsonStr=jsonStr.replace("\\", "");

After Replace : "http://wso2.org/claims/enduser":"admin@carbon.super",

5. Then if we need to perform our acceptation and rejection based on enduser value as we have decided,  we should split the enduser value by the below claim. You can use any claim value from the above.

                        var tempStr = new Array();
                tempStr= jsonStr.split('http://wso2.org/claims/enduser\":\"');


6. We have split it in to 2 values. So the rest of the value after the enduser claim which is in tempStr[1], we split again to retrieve only the enduser value which is admin@carbon.super


Value needs to be split :

admin@carbon.super",


                var decoded = new Array();
                decoded = tempStr[1].split("\"");

7. To access the enduser value in our synapse level, we need to set the decoded enduser value in to message context as below by setting it as a property. I have set it as username.

setProperty(String key, Object value)
Set a custom (local) property with the given name on the message instance 
 
mc.setProperty("username",decoded[0]);

8. Then use a filter mediator to perform action based on the username. In here, I have logged a message if the username = admin@carbon.super and dropped the request if it is another user. For more information on Filter mediator, please have a look at this [2]

<?xml version="1.0" encoding="UTF-8"?> <filter source="get-property('username')" regex="admin@carbon.super"> <then> <log level="custom"> <property name="accept" value="Accept the message" /> </log> </then> <else> <drop /> </else> </filter>

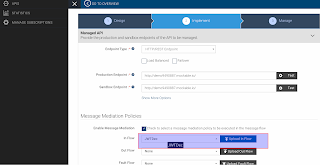
9. I have uploaded my custom mediation extension via publisher as given in the below screen. You have to republish the API once you save it, if it is already published. 


So my complete mediation extension is as below :


<sequence xmlns="http://ws.apache.org/ns/synapse" name="JWTDec">
    <log level="custom">
      <property name="X-JWT-Assertion" expression="get-property('transport','X-JWT-Assertion')"/>
    </log>
  <property name="authheader" expression="get-property('transport','X-JWT-Assertion')" scope="default" type="STRING" description="get X-JWT-Assertion header"/>
            <script language="js" description="extract username">
  var temp_auth = mc.getProperty('authheader').trim();
                var val = new Array();
                val= temp_auth.split("\\.");
                var auth=val[1];
                var jsonStr = Packages.java.lang.String(Packages.org.apache.axiom.om.util.Base64.decode(auth), "UTF-8");
                jsonStr=jsonStr.replace("\\", "");
                var tempStr = new Array();
                tempStr= jsonStr.split('http://wso2.org/claims/enduser\":\"');
                var decoded = new Array();
                decoded = tempStr[1].split("\"");
  mc.setProperty("username",decoded[0]);
  </script>
   
         <log level="custom">
       <property name="username" expression="get-property('username')"/>
     </log> 

                <filter source="get-property('username')" regex="admin@carbon.super">
                     <then>
                    <log level="custom">
                      <property name="accept" value="Accept the message"/>
                    </log>
                 </then>
                 <else>
                   <drop/>
                 </else>
               </filter>

        
</sequence>


Wednesday, February 1, 2017

How to Debug WSO2 Developer Studio tooling platform

This blog post shows you how to debug WSO2 Developer studio tooling platform

I have selected developer studio kernel plugins to debug in this sample.

1. First of all you have to find the correct source you are going to debug from https://github.com/wso2/devstudio-tooling-platform

2. Once you checked out the code in to GIT, you have to download related eclipse. It is not a must to install P2 features when you need to debug.
E.g., To debug 3.8.0 appcloud.utils I have downloaded eclipse mars2.

3. Then import the particular source code in to eclipse as an existing maven project. This might install all the dependencies and ask to restart the eclipse. You need to press ok.


4. Then select the particular package you need to debug and then click on Run -> Run As -> Eclipse Application. In this sample I have selected org.wso2.developerstudio.appcloud.utils.client

If you cannot find the Eclipse Application you can add it by Run Configurations ->  Double click on Eclipse Application and add a new application and provide a  preferred name.


5. Click on Run. If it popups any errors, if it is not affected to your package, proceed with it.

6. Then you can press OK if you wish to point to the same workspace.

7. Once you run the application, to debug the code, follow the same steps in Run -> Debug As -> Eclipse Application. If you do not find Eclipse Application, Debug Configurations -> Double click on Eclipse Application and add a new application and provide a  preferred name.

8. It will load a new eclipse.


9. Now you can mark the debug points in the code and proceed with the tooling features in the loaded eclipse to debug the code.

10. Click yes to open the debug perspective.


11. It will load the debug mode of the source.